

Virtual Internet Routing Lab is Cisco’s official network emulation solution, under the hood VIRL is a version of OpenStack that has some network centric tweaks that are useful to a network professional. This means that VIRL is a orchestration platform that provisions router and switches dynamically rather than trying to directly run IOS through Dynamips like GNS3 does.
Pros
- Cisco provides frequently updated images for various platforms.
- It is fairly flexible and evolving solution.
- Has the strongest switching support of all the solutions.
- Multi-Vendor friendly.
- Provides hands on with OpenStack and automation.
- Has a fairly cheap cloud option.
- Only Cisco nodes count towards the license count.
Cons
- VIRL is an annually licensed product where you pay for the ability to run either 20 or 30 Cisco nodes at once.
- Because the solution is running devices as internal VMs it can take a lot of RAM and CPU to run large topologies. I recommend shooting for at least 32gb of RAM in most cases.
- The solution tends to be more complicated than GNS3.
- No serial interface support, this isn’t really a big deal since serial is barely on the new CCNA but you’ll need to use another solution for serial centric labs.
Node Types
VIRL supports a number of devices by default, at the time of writing the included nodes are:
| Routers | Description |
| IOSv | A lightweight IOS router that supports everything a CCNA / CCNP needs. |
| CSR1000v | A heavyweight IOS-XE router that is suited for CCIE studies. |
| IOS XRv | A Service Provider IOS-XR router that is suited for the Cisco Service Provider track. |
| Switches | Description |
| Unmanaged Switch | A virtual switch similar to GNS3’s virtual switch. Just provides connections between devices. |
| IOSvL2 | A IOS switch that supports a good chunk of the CCNA/CCNP/CCIE switching features you would want. We’ll talk about the limitations when we get there. |
| NX-OSv | A Nexus switch that supports L2 features, L3 features, and some of the Nexus specific features. This will be replaced by the upcoming Nexus 9k image that may have better support. |
| Firewalls | Description |
| ASAv | ASA firewall image that supports most of the CCNA Security features. |
| Servers | Description |
| Server | An Ubuntu 14 image |
| LXC | A lightweight linux container |
| LXC-iperf | A linux container that has iperf baked in |
| LXC-ostinato | A linux container with traffic generation baked in |
| LXC-routem | A linux container with route injection baked in |
Networks
VIRL uses the following networks by default, you will need to create these networks/vlans in your VMware Workstation or ESXi before starting the installation.

| Network | Description |
| Management | This is the mgmt network for VIRL, this is the IP that you would access to get the web interface, ssh to the box, or use VMMaestro. |
| FLAT | This network provides L2 external connectivity. |
| FLAT1 | This network provides an additional external network. |
| SNAT | This network provides external access by using Source NAT. |
| INT | This network is used for internal communications and clustering. |
Installation – VMware Workstation
I personally recommend running VIRL on VMware ESXi but it does support being installed on VMware Workstation if you would rather have the solution running on your desktop/laptop.
Cisco provides a handy OVA file for installing VIRL so we can start the installation just by opening the OVA file.

Then we will name the VM and choose where it will be installed.


Under Edit -> Virtual Network Editor you will need to create VMnet adapters for the 5 VIRL networks. You can generally use host only for the internal and flat networks and VMnet8 for NAT. Whether or not you can get away with using host-only for the flat networks depends on if you are running VM that does routing outside of the host.
I recommend setting the subnet addresses to be a sequential range that makes sense to you.

When your networks are sorted out we will now look at the VM settings.
First make sure that Virtualize Intel VT-x/EPT or AMD-V/RVI is checked. If you can’t check this then you may need to enable the setting in your BIOS first.

Then we need to assign the networks we created to the network adapters, the nics are in the order listed above, Network Adapter 1 is the management network through to Network Adapter 5 being the INT network.

At this point we can boot the VM, the default login is virl / VIRL

Once logged in we want to first make sure the system is healthy and online so we will open up xterm.

In the terminal we want to make sure virtualization is working ok by typing the sudo kvm-ok, we want to see that KVM acceleration can be used, if not you likely didn’t check that CPU option above or it is disabled in your BIOS.
If you are truly unlucky then your computer doesn’t support virtualization and you need to upgrade before continuing, don’t worry I’ll wait…
Once KVM is happy then we need to make sure DNS works, you can test this anyway you want but a ping test is usually good enough.

Next up we need configure the server and load the license information. It is easiest to use the UWM Administration page to load the license information, you can do this by going to https://<mgmt ip>/ and clicking User Workspace Management

The default login is uwmadmin / password

Click on VIRL Server -> Salt Configuration and Status
then click on Reset keys and ID

Here is where we enter all the license information and the contents of the PEM certificate that Cisco provides you.


Once VIRL is activated we need to edit the virl.ini file to use the correct subnets and IPs,

When you are done updating the file work your way through the numbered files on the desktop starting with Upgrade or Rehost, this will take about 40 min to an hour.


Projects / Users
A Project is a workspace that contains the running topologies and lets you enforce quotas, you can have as many Projects as you want and can also set expiry dates if you wanted to make sure someone could only use the project over the weekend etc. I recommend creating a new project rather than using the default uwmadmin.

Name the project something that makes sense to you and press Ok.

When you create a project, a user will be created as well along with a randomly generated password. I recommend setting a password you can remember. In most cases you should set the role to be admin to avoid some of the annoying limitations that can pop up when your doing more advanced topologies. You can also setup SSH keys if you want to use SSH authentication for some tasks.

VIRL Server
The VIRL Server section contains the bulk of the server configuration options.
System Configuration
Let’s take a look at System, Network, and OpenVPN. The others deal with advanced settings like adjust ports and OpenStack settings.
System lets you change things like the server hostname and the management network information. One of the more useful options is enabling the Ramdisk enabled which improves I/O performance if you have over 16gb of ram in the server.

Network lets you change the IP address info for the FLAT, FLAT1, and SNAT networks. You can also change what nic the INT network uses but you have to edit viri.ini to change the subnet.


OpenVPN enables you VPN directly into the FLAT L2 network, this is especially useful for using VIRLs cloud option or for connecting external devices or hosts directly to the VIRL external network. This is also a great way to access your VIRL environment remotely!
To enable OpenVPN check the OpenVPN server on/off button as well as the Use TCP port (for performance) then adjust the FLAT network range to suite your setup, the range should be outside of the regular FLAT network range.
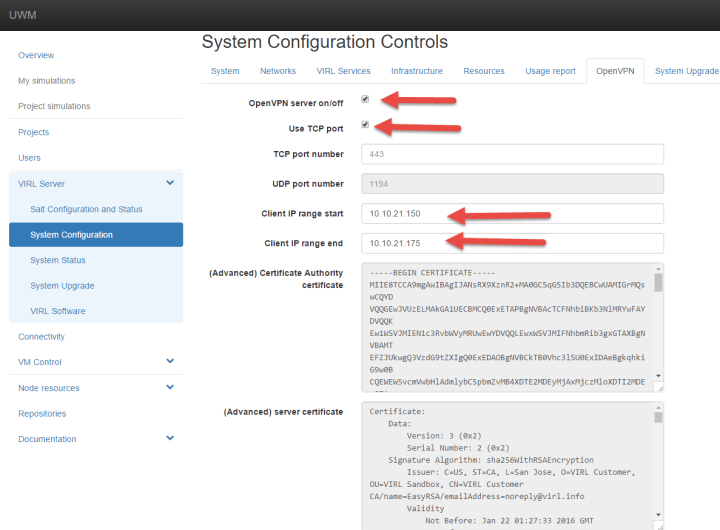
At this point we can press the apply settings button, depending on the settings enabled this can take awhile to complete.

Once everything is applied you can download the openvpn configuration file by clicking the username in the top right and then clicking the download button. Then you simply need to run the config file in your OpenVPN client and you are connected.
![]()

System Upgrade
The System Upgrade is a somewhat new page that makes upgrading the server and the nodes fairly easy, all you need to do is put the server into maintenance mode, decide if you want to upgrade just the server or the server and nodes, then press the Upgrade button. As usual this takes awhile.

VIRL Software
This is the classic upgrade page where you can upgrade individual components as they become available. This is useful for upgrading a particular VM image.

Clustering
Because VIRL takes a lot of resources to run, it may make more sense to cluster the solution so you can spread the load across several ESXi hosts or barebone servers. You technically could cluster with VMware Workstation but you probably won’t get the same bang for your buck unless you have multiple VMware Workstation computers.
The networking setup would require each VM or host to have access to each of the VIRL networks. In my case I’m using a Distributed vSwitch to make life easy but if I didn’t have one I would have to create the 5 VIRL networks on each of the hosts.

Cisco provides some compute images in VIRL’s download section, this is a stripped down image that just contains enough bits to enable them to do the compute and networking for the solution. Why is there four compute images? Because they are slightly customized to save you some deployment time but your probably not saving too much time by having the hostname set for you 🙂

When we deploy the images we set the virtual networks the same as we did with Workstation, I’m going to take this opportunity to switch over to my ESXi installation from here on out but the actual platform won’t matter too much.

Then we wait for the deployment to complete in several minutes.

Once they are deployed go ahead and adjust the RAM to what suites your environment and boot them.

On the VIRL Master / Controller we go ahead and setup the networks etc like we did before in viri.ini but this time we will scroll down to bottom set virl_cluster to true. Then we need to set the Compute Specifics to use the proper IPs for the VIRL networks.
I will be using 4 compute nodes so I will be setting Compute1 through Compute4, if you want to use less nodes then just configure what you need, if you want more then copy/paste the configuration from Compute1 or such and edit it to be Compute5 or whatever number you need.
Once your done apply the configuration like we did before by pressing the Upgrade / Rehost button and working your way through the 4 step program.

Once it is done you should see the Compute nodes in System Configuration.

Next we need to update the salt on the controller / master to support clustering.
You may want to make a backup of the old directory just in case things go terribly wrong.
virl@virl01:~$ sudo mv /srv/salt/ /srv/old-salt
We can download the salt by doing the following:
sudo git clone https://github.com/Snergster/virl-salt /srv/salt
 virl@virl01:~$ cd /srv
 virl@virl01:/srv$ sudo git clone https://github.com/Snergster/virl-salt salt
 Cloning into 'salt'...
 remote: Counting objects: 10570, done.
 remote: Compressing objects: 100% (140/140), done.
 remote: Total 10570 (delta 75), reused 0 (delta 0), pack-reused 10429
 Receiving objects: 100% (10570/10570), 15.99 MiB | 2.92 MiB/s, done.
 Resolving deltas: 100% (7302/7302), done.
 Checking connectivity... done.
Once that is done do a ls to make sure the files have downloaded properly.
virl@virl01:/srv$ ls salt/
 buggytop.sls files install_salt.sh _modules openstack reactor routervms.sls tightvncserver.sls users virl vmware-patch.sls
 common guest.sls iso-ssh.sls ntp.sls openstack-restart.sls README runners top.sls vagrant-key.sls virl-restart.sls vmware-tools.sls
 demo host.sls LICENSE onedev.sls orchestration README.md _states training.sls vinstall.sls vmware zero.sls
Then reboot the server.
virl@virl01:/srv$ sudo reboot

Broadcast message from virl@virl01
 (/dev/pts/11) at 12:43 ...

The system is going down for reboot NOW!
Part of the problem with using the prebuilt compute images is that they assume the controller has the IP 172.16.10.250, which is great if it does but we need to change it if it doesn’t. On each Compute node, edit the master section of /etc/salt/minion.d/extra.conf
virl@compute4:~$ sudo vi /etc/salt/minion.d/extra.conf
 master: 10.10.20.250
 state_output: mixed
 id: compute4
 append_domain: virl30.info
Lastly make and run a simple bash script to install the rest of the VIRL/OpenStack components.
virl@compute1:~$ vi setup.sh
 #!/bin/bash

sudo salt-call state.sls virl.basics
 sudo salt-call state.sls common.virl
 sudo salt-call state.sls openstack.compute
 sudo salt-call state.sls openstack.setup
 virl@compute1:~$ sudo chmod 777 setup.sh
 virl@compute1:~$ sudo ./setup.sh
Once everything is done we can verify everything is happy by logging into the controller and using the following commands:
nova service-list – This shows the compute nodes that OpenStack’s nova is aware of.

neutron agent-list – This shows the network agents that OpenStack’s neutron is aware of.

After all that when we launch nodes it will be distributed across the compute nodes!!!

Connectivity
This section allows you keep track of the various connections that VIRL’s running topology is using, you can also add static connections for certain advanced functions that we don’t need to go into at this time.
What is more interesting is that you can use the following link to download the Flatter.sh script.
This allows you create more FLAT networks for more advanced external topologies, for example if you wanted to have 4 routers with their own separate external network that connects to a different “ISP” router.
Node Resources
This section allows you to customize VM images or upload new ones. You would use this to upload a Juniper or VyOS router or Arista switch into VIRL. You can also use this to customize the Ubuntu Server node but I’ll cover that another time.
To customize a node to use less memory or to do things like disable the VIRL management interface you can use the Specialize subtype button under a node or import a JSON file.

VMMaestro
VIRL uses VMMaestro as its GUI client where you can actually build topologies and run nodes, installing it is a next / next / finish affair so I’ll skip over that step and go start to when you first start the program.
The first thing you have to do is aside from accepting the license agreement is point VMMaestro to the VIRL server and specifying the username and password for the project.

Once we enter the information we should get a “All web services are verified” message, if you don’t see the green mark of happiness then make sure your VIRL server is up and the username/password is correct.

User Interface
Let’s take a bit of a tour of the UI.

The menu along the top allows to the common stuff like make a new file, save, adjust the zoom, start and stop the topology, and control what is show on screen.


Along the left-hand side we have:
Tools – Allows you to pick between the standard selection tool and the Connect tool so you can add links between devices.
Nodes – This is the list of nodes that is available to VIRL. You can add nodes by selecting the device you want and clicking in the center canvas.
General – This is where you can add your external networks to the topology and create a Site (more on that later)
If you have added new nodes to VIRL or you are missing some nodes that should be there, go File -> Preferences -> Node Subtypes then click Fetch from Server.

VMMaestro will then download the updated list of nodes from VIRL and update the node list. Don’t forget to press Apply or OK!

Management Network
The first decision to make when starting a topology is picking what network is used for the management network, VIRL will use the first port on any device as a management port unless you explicitly disable it for the Node subtype, it does this so it can do things like push configurations etc. The management IP is installed as a VRF so it is separate from the node’s global routing table.
There are three options for the management network.

Private Simulation
VIRL creates a LXC node that only has connectity to just the management IPs in the running simulation. If you don’t make a selection it will default to this option.
Private Project
VIRL creates a LXC node that has connectivity to the management IPs in running simulation as well as other running simulations that are part of the project.
Shared Flat Network
VIRL uses the FLAT network to issue management IPs, this allows for the nodes to have external connectivity through the mgmt network VRF.
In most topologies it doesn’t matter too much since you’ll be connecting through the console port but you can choose to use the external FLAT network for management so all your device’s management IP will be externally accessible. The downside is you can not use flat connections in the topology since they will conflict with management IPs.
Global AutoNetkit
One of the handy features VIRL provides is the ability to generate startup configurations by entering information into AutoNetkit, you can access the global settings for AutoNetkit when you don’t have any nodes selected in your topology then click the AutoNetkit button on the bottom of the screen.
The global options let do things like enable CDP automatically and set what IP schemes and routing to use. If you don’t want AutoNetkit to configure interfaces etc then set the Infrastructure Only option to true.

Working with Nodes
This section will go over some tips and tricks to working with nodes
Node Editor
The node editor provides a way to easily add interfaces to nodes and lets you change what ports are connected to what.

To add some extra interfaces, click on the node or the connection between a node, press the Interface button, when you hover your mouse over the node (a switch in my case) you’ll see a + sign. Then click the node to add an interface.
In Node Editor it will show connected interfaces as red…well more of a pink and unconnected interfaces as green.

If you want to make an interface a particular number, click the Name box on the properties section on the bottom of the screen. Then select the new interface you want to change the node’s interface to.

Lastly you can drag the connected links from interface to interface in Node Editor to move the link. It is hard to show this in screenshots but it is easier then it sounds 🙂

Renaming nodes
When you add a device to the topology it will have a default name of <device type>-# which isn’t very pretty. You can rename a node by double-clicking the node and renaming it or by clicking the node and changing the name property.

That is fine for a few nodes but lets draw a larger topology like so:

Now it would take a bit more time to rename everything in a R## convention, this seems like a time to show the value of editing the .virl files! When you are done dragging some nodes to the topology, press the save button. Now if you right click the topology file your working on and go Open With -> System Editor then VIRL will ask you what program the System Editor and you can pick your preferred text editor.

Once the file is open you can simply do a Replace to quickly edit your topology and save.

Then simply refresh the topology with either F5 or by right clicking and selecting Refresh

Now all the nodes are named the way we want! The key take away here is that .virl files can be edited as needed.

AutoNetkit
As mentioned above AutoNetkit helps you quickly build topologies by building the configuration for you based on the settings you select. A CCNA might find some value in letting the tool generate more complicated configurations for them to look over.
Here is a quick breakdown of the various sections that the CSR node has.
This part enables AutoNetkit for the node and sets the BGP AS number.

IGP sets what routing protocol the router wants to use.

Likewise iBGP is the iBGP settings, you don’t really need this section for lower level.

The custom configuration section lets you insert specific configuration under various config stanzas, in this example am setting the OSPF router-id and summarizing the area 1 network.
Note: There is no spell checking etc here, if you enter a invalid command then the router will simply discard it when it boots.

This section lets you change MPLS settings.

This one is setting up L2VPNs

You can also have VIRL setup GRE tunnels for you.

Lastly some nodes have the ability to communicate with a OpenDaylight SDN controller for certain functions. This section is part of that feature.

Once we’re done with the AutoNetkit stuff, we can press the Build Configuration button to have VIRL generate the configurations for us.
Note: While you don’t need to use AutoNetkit at all for routers, switches, and firewalls. You do need to build configuration if you are using servers or it will not generate a login for you to access the server.

You can use the Extensions tab to set static IPs for your flat or mgmt network by using the static_ip keyword.

Starting Nodes
Ok! At this point we should have some routers in our topology and we generated some config so now it is time to press the Launch Simulation button up top. VIRL will take take you the simulation tab and start building and starting the devices. It will also switch you to a view that shows the active devices, if it doesn’t because you played with the defaults you can click the simulation tab yourself and you can get to the active topology by right click the simulation name and selecting View Simulation.

In the View Simulation page, the devices will turn green to show they are active, from here you can do things like extract configurations, disable/enable interfaces, start packet captures (more on that in a bit), or stop some devices.

You can also emulate a WAN by adding latency or packet loss to a link by right clicking the middle of a link and choosing modify.


On the Simulations tab on the right of the screen you will see a list of the accessible devices as well as the LXC management node. If you had external networks they would be listed here as well.
From this tab you can stop the simulation, telnet or ssh to the device’s console port or external interface, or access the web interface. Let’s have a look at the web interface for a bit.

The login will be the project’s username/password.

When your logged in you’ll see a somewhat more pretty representation of the topology! It has a few other features that can be quite handy.

By left clicking on a node you can do the standard stuff like stop the node or connect to its console port (if your browser is setup to use a telnet client) but you can also do things like graphical traceroutes and pings.


You can also disable/enable links or at traffic shaping just like you can in VMMaestro.

A handy feature you can use the Actions menu to collect information from all the running devices. For example I’ll press the Collect Route Table option.

Then I can see the results by pressing the Log button.

The next feature we’ll look at in the web interface is the ability to do central syslog for the topology. You can enable it by either picking the Setup Syslog option in the Action menu or by entering the following in our device configuration. The IP address is the IP of the LXC management node for your topology.
R13(config)#logging trap debugging
R13(config)#logging host 10.255.0.124 vrf Mgmt-intf
Once that is setup you can see all the logs by pressing Syslog in the top right, you can also filter logs to find what your looking for.

The last thing we’ll look at in the web interface is that you can have the topology dynamically show you the STP, VLAN, or routing topologies by selecting the left most menu.


Packet Capturing
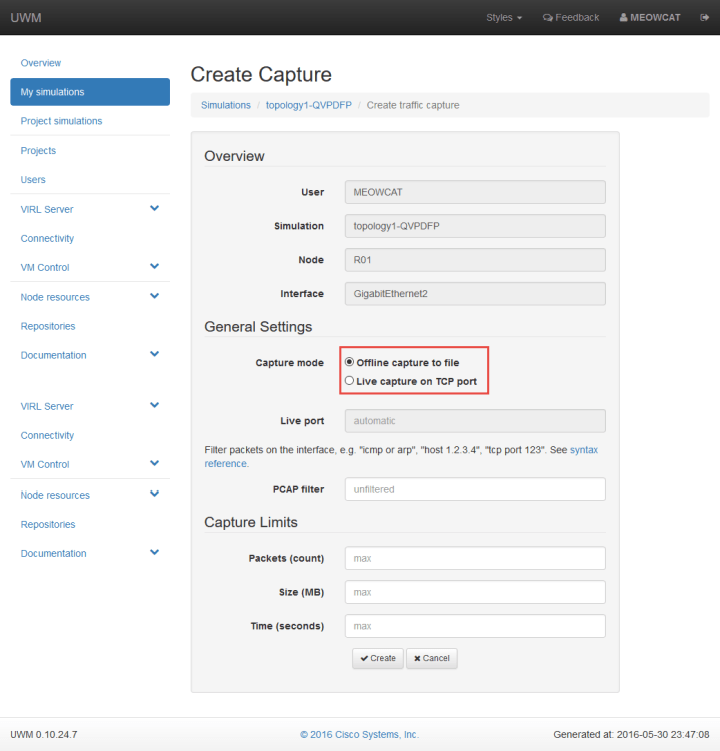
VIRL can also setup packet capturing by right clicking the device interface and choosing the packet capture option, it is also possible to start a capture from the web interface which shortcuts over to the UWM Admin page.
If you are in the web interface you will have the Setup Packet Capture option

Which jumps you over to the Create Capture page, you have a choice of doing an offline capture where you download the .pcap file or a live capture where VIRL streams the capture so you can connect wireshark to it.
In VMMaestro you start a capture by right clicking the link, and choosing Create new under Packet Captures.

Then pick whether you are doing a Live or Offline capture. I’ll do both for fun.


Right click again and select the Open Packet Captures view, this will show you a list of all active Packet Captures, for offline captures you can choose to download the .pcap, it will ask you save the file first.

For the Live capture option we need to use the netcat utility to connect to VIRL’s packet capture stream and create a named pipe. Here is a simple bash script that I picked from the VIRL community site that you can run on a mac or linux, Windows takes a bit more work but I’ll cover that another time.
iMac01:~ TPT$ cat virl.sh
#!/bin/bash

# VIRL host and port
HOST=10.20.2.5
PORT=$1
PIPE=/tmp/live_capture

if [[ ! -p $PIPE ]]; then
 mkfifo $PIPE
fi

echo; echo; echo
echo "Captured traffic dumped to $PIPE..."
echo; echo; echo
nc $HOST $PORT > $PIPE
rm $PIPE
In the Packet Capture menu it will show you what port VIRL is sending the traffic to, in this case it is port 10001, it will increment as you add more active captures. To run the script use the port number as the argument.
iMac01:~ TPT$ ./virl.sh 10001

Captured traffic dumped to /tmp/live_capture...
Then open up Wireshark, go to Capture Interfaces -> Manage Interfaces -> Pipes, and add /tmp/live_capture, press enter and start the capture

You will now have a live packet capture from your device.

Terminal
Last thing to mention is the terminal, by default VIRL uses an internal console to connect to devices that works ok, you can adjust some settings by going to: File -> Preferences -> Terminal -> Cisco Terminal from there I recommend changing the Title format to %s so nodes only display their short name instead of their life story.

If you want to use something like SecureCRT or Putty you can the below settings as a template.

That’s all folks,
Here is some useful links for learning more about VIRL
VIRL product site: http://virl.cisco.com/
Community Support Forum for VIRL: https://learningnetwork.cisco.com/groups/virl
Installation documentation (for other deployment options): http://virl-dev-innovate.cisco.com/
VIRL/VM Maestro tutorial: http://virl-dev-innovate.cisco.com/tutorial.php